• Portfolio
  • Blog
  • Travel
    • Russia/Estonia
    • Istanbul
    • Hong Kong
    • India
    • Morocco
    • Thailand
    • Italy
    • Vietnam
    • Spain/Portugal
    • Egypt
    • United Arab Emirates
    • Ireland
    • Myanmar
    • Croatia
    • Mauthausen Concentration Camp
  • Headshots
  • Fine Art Prints
  • New Work
  • About
  • Instagram
  • Contact
Assignment Photography for Corporate America
  • Portfolio
  • Blog
  • Travel
    • Russia/Estonia
    • Istanbul
    • Hong Kong
    • India
    • Morocco
    • Thailand
    • Italy
    • Vietnam
    • Spain/Portugal
    • Egypt
    • United Arab Emirates
    • Ireland
    • Myanmar
    • Croatia
    • Mauthausen Concentration Camp
  • Headshots
  • Fine Art Prints
  • New Work
  • About
  • Instagram
  • Contact

FourSquare™… and I'm Not Talking About The Game

I had lunch today with a long time friend and product developer Paul Peregrine. Paul is the developer and brains behind those fine photographic bags know as Lightware. After lunch, we headed over to his office and studio to have a look at a new product he has developed for small strobe users like myself. It's know as The FourSquare™.

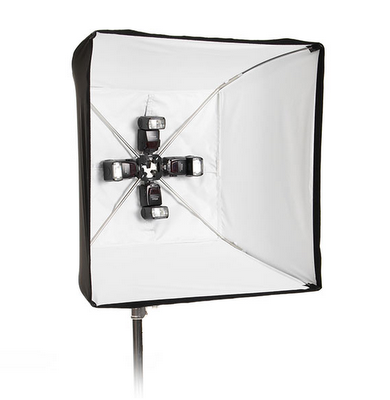
This is a very clever small strobe mount and softbox combo. The key to the system is the Four Square mount which allows up to 4 speedlights to be mounted into a 30" X 30" softbox. The real big plus to this system is the size of the complete kit. The softbox and FourSquare mount fit into a stuff sack measuring only 18".

I've only had a short time to play with it, I think Paul has a winner here. What's really cool about the system is that you don't need a speedring and then something else to mount your strobes. Everything you need fits into the small bag shown above. I use my usual umbrella adapter to mount the FourSquare™ to a light stand.


You don't have to use the softbox if you don't want to.
How about just straight or perhaps a double soft bounce into and through an umbrella.
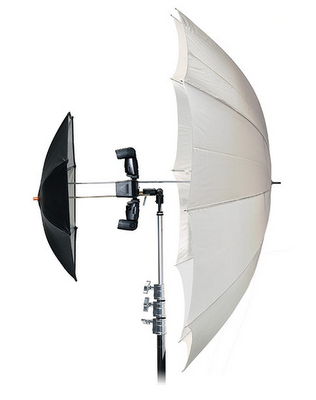
I've only had a few minutes to play with the new FourSquare™, but from what I've experienced so far, I like it!

Here are some of the first shots using this system. I shot these photos of Ian using high speed sync. I had 2 SB-800 mounted inside the FourSquare™ fired via CLS. The image below was shot at 1/4000 @ f/3.5


The image below was shot at 1/1600 @ f/3.5

I've got a few assignments in the next couple of weeks. I hope to put the FourSquare™ through it's paces. To learn more about this clever and compact lighting tool, check out their web site. The FourSquare™ is scheduled for release in the next few weeks. It is only available directly through their website Lightware Direct.

I still have a few spaces left for the June 28th Small Strobes, Big Results workshop in Buffalo. We have been granted access to the historic Central Terminal Train Station. If your interested in attending please contact me.

Thursday 05.14.09
Posted by David Tejada
Comments: 6
 

So What's The "X" For?

I've been asked often what the X stands for in my name. I have a friend in Austria that swears it stands for X-treme. My full name is David Ximeno Tejada. Ximeno pronounced "He-men-o".

My father's name was Ximeno, he was born in La Paz, Bolivia, SA. My dad's and his family moved to the United States when he was just 10 years of age. He grew up in CA and that is where I was born.

Did I also mention, I have a twin sister? That's me on the right... really.

Thursday 05.14.09
Posted by David Tejada
Comments: 2
 

Shooting for the fun of it


I have been in the process of remodeling our master bathroom for months, about 12 months to be exact. I've managed to install the new shower as well as the new clawfoot tub that my wife has been wanting for years.

This past weekend I decided to pull the camera and a flash out and practice a bit. This should be no surprise to past attendees of a Small Strobes, Big Results workshop. I am always telling them to practice with their strobes, I do and you should too.


I shot in and around the partially re-modeled bathroom, focusing in on more detail shots that would make for a great grouping as a wall hanging. Even though these images where shot in color, I prefer the antique or aged B/W.


I used a single Nikon SB-800 flash set to remote and I used an SU-800 command unit to fire the strobe. I hand held the strobe for most of the photos, one I actually just laid the strobe down in the tub to scatter the light for one of the shots.

As a reminder, I'm holding a Small Strobes, Big results Workshop in Buffalo, NY on June 28th. We'll be shooting in the historic Central Terminal Train Station. This is going to be a fantastic location to shoot in. I hope to see a lot of you Toronto folks at this workshop.

Monday 05.11.09
Posted by David Tejada
Comments: 5
 

Buffalo Central Terminal SSBR

It's official! The June 28th Small Strobes, Big Results workshops has been granted permission to shoot inside the historic Buffalo Central Terminal Train Station. I am very excited about this particular workshop, what a fantastic location to shoot in! I just love these old locations, have a look at what we did at Eastern State Penitentiary a few months back.

The Buffalo Central Terminal opened to the public on June 22, 1929. Built by the New York Central Railroad and designed by architects Alfred T. Fellheimer & Steward Wagner, the art deco style station was built to accommodate up to 3200 passengers per hour, or 200 trains per day. The complex consists of the main concourse, a 17 story office tower, a four story baggage building and two story mail building along Curtiss Street, and the now detached train concourse. The complex sits on a 17 acre site 2.5 miles east of downtown Buffalo.

This very cool location has been used in several famous movies such as "Route 66", "Best Friends" staring Goldie Hawn and Burt Reynolds, and in "The Natural" with Robert Redford.


We're going to have a great time shooting is this location. I still have space available for this workshop, but I'm certain those spaces are going to go fast.

Our workshop is hosted by Aylssa & Rich of Nickle City Studios in Buffalo. Our morning session will be held at their studio and than after lunch we'll head on over to the Buffalo Central Terminal for some shooting.

Give me a call if your interested in attending. DT

Thursday 05.07.09
Posted by David Tejada
 

Portraits, Portraits, Portraits


Employee portraits can be a photographers bread and butter. I was recently was asked by a regular client of mine to produce new portraits of their senior staff. My client wanted several portraits of each employee, some casual and some more formal.

I scouted my clients location a couple of days before the actual shoot. We came up with 5 separate locations for the portraits. These 5 locations where close to each other which made is easy to simply walk our subject from set to set. These locations allowed for different looks and feels to each image. Having several settings to photograph these employees in allows my client to combine several photos of their employees without having the same settings.

On the day of the shoot, I arrived about 90 minutes before the first scheduled employee was to be photographed. I took this time to light 5 separate locations where the portraits where to be taken. In the photo below you can see several lit sets for the portraits, actually I was able to squeak out 4 shots here and another just down the hall.

Another wonderful thing my client did was spring for a make-up artist. Each subject had a few minutes in the chair for some make up and general touch up. It's not often I have clients allow for the additional expense for make up, I could get use to this. We had a terrific gal named Alisha. She did a fantastic job and I look forward to working with her again.


Through the course of the day we shot over 15 employees, I also had several important photos of the CEO to do as well. Not only did I photograph him in the same setting as all the other employees, I shot him in the boardroom as well as in his personal office.

The lighting set up photo above should show you that all of the portraits where lit using the bounce technique. By bouncing your lights off of surfaces such as walls and flats or panels, you can create some mighty fine light. I used a total of 5 SB-800's and one SB-24 on a pocket wizard. At each set, I taped a note to the flash with all the camera and flash setting I needed to use for the given shot I was taking. There was only one portrait that required a background or second light, all the rest of the portraits where made using one light.


I have another 12 or so employees to photography later next week. While on a break between portraits, we scouted for additional location on the 12th floor for next weeks portraits. We shot some video of the shoot and I'll be posting that as well as the CEO portrait at a later date. Have a great weekend. DT

Friday 05.01.09
Posted by David Tejada
Comments: 10
 

Guy's In Ties. The Executive Portrait

As a corporate shooter specializing in annual report photography, the CEO portrait as well as senior executive portraits are common subject matter we need to deal with.

In my mind, the CEO portrait could be the most important photo you'll take for the annual report. If the CEO hates his or her photo, the chances of you shooting the following years annual are slim. When it comes to the CEO portrait, don't take any unnecessary chances with their portrait. Your not going to win any awards with their portrait so play it safe.

I try to get as many preliminary arrangements taken care of before I arrive on location. Those arrangements may include: making sure all light fixture have functioning light bulbs in them, having a ladder available for me or my assistant should we need one of lights or what ever. I like knowing what my subject looks like, are they tall, over weight, do they have hair on their head or not. I also like to receive some personal information about my subject, does my subject have family, children, where does he or she like to vacation? All of these preliminary arrangements and personal information makes for a more successful portrait shoot in my mind.In most cases,

Typically, I arrive on location at least 90 minutes prior to the actual time the executive will be photographed. This give me enough time to scout all the possible locations for the photo as well as designing the lighting for the portrait. I'm given anywhere from 5 to 10 minutes to photography the CEO. All my lighting is set well in advance of the executive showing up for their portrait. The director of communications or the IR representative is more concerned about not taking up the CEO's time than with the final image.

My number one goal is to put the CEO at ease! I want to project a sense of confidence in my abilities and to show my concern about making my subject look great. I am often asked what the CEO should wear for their portrait, what color shirt or suite. I want my subject to wear what ever makes them look their very best. Extra ties or a shirt are always a nice option as well.

I try to schedule their portrait as early in the day as possible. Scheduling an early portrait session insures less wrinkles in their clothing and helps prevent the 5 o'clock shadow in the case of men. When it comes to posing the CEO, I usually show them exactly how and where I would like them to stand. The CEO portrait denotes a different message than others that might be photographed for the annual. The CEO should look like he or she is confident, smart, in control and powerful.

Lighting of course in important, the image at the top of this post shows the use of light to contain the viewer eye as well as direct them to the two subjects in the photo. I was asked to incorporate the company seal in the photo which meant have a high prospective in order to do so.

For the lighting, I used a large softbox camera left for the key light as well as a fill card on camera right to open the shadow side of the faces. For the background light I used a bare head with a full CTO gel and a set of panels in order to shape the light in the "V" shape.

The angle was so high I actually needed to put my tripod in the drop ceiling and reverse the center column. This allowed me the opportunity to get my camera as high as possible, looking like I was sighting through a periscope on a sub.

Monday 04.20.09
Posted by David Tejada
Comments: 11
 
Newer / Older

Powered by Squarespace.