• Portfolio
  • Blog
  • Travel
    • Russia/Estonia
    • Istanbul
    • Hong Kong
    • India
    • Morocco
    • Thailand
    • Italy
    • Vietnam
    • Spain/Portugal
    • Egypt
    • United Arab Emirates
    • Ireland
    • Myanmar
    • Croatia
    • Mauthausen Concentration Camp
  • Headshots
  • Fine Art Prints
  • New Work
  • About
  • Instagram
  • Contact
Assignment Photography for Corporate America
  • Portfolio
  • Blog
  • Travel
    • Russia/Estonia
    • Istanbul
    • Hong Kong
    • India
    • Morocco
    • Thailand
    • Italy
    • Vietnam
    • Spain/Portugal
    • Egypt
    • United Arab Emirates
    • Ireland
    • Myanmar
    • Croatia
    • Mauthausen Concentration Camp
  • Headshots
  • Fine Art Prints
  • New Work
  • About
  • Instagram
  • Contact

I Just Love Bounce


Like many photographers, I carry a variety of light modifiers in my lighting kit. I carry everything from umbrellas, softboxes, grids and snoots. The largest modifier I carry is a 60" umbrella, when I need something larger I resort to a bounce.

Learning how to create an effective bounce is key when working on location. One of the most important aspect to a good bounce is flagging your strobe and preventing any direct light from reaching your subject. The only light reaching your subject should be from the bounced surface.


The photo above illustrate that point clearly. I used a foam flag attached to the strobe on the subject side of the flash. You can see the shadow on the carpet in the hallway, indicating that the strobe flag is preventing light from reaching our subject directly. The size of the bounce determines the quality of the light on our subject. The size of the bounce is certainly larger than the 60" umbrella I carry. I can light a wall to what ever size I choose. It's just not practical to carry a 12' X 12' modifier in my small lighting kit.

To round out the rest of the lighting, I added a slight hair light and a background blue gelled light down the hall.

Saturday 12.19.09
Posted by David Tejada
Comments: 2
 

FourSquare™ Double Bounce Softness

During the recent San Diego, Nikonian's workshop, I demonstrated a wonderful feature of the popular FourSquare™. The hub of the system is the Square block that the 4 flashes attach to. One of the features of this block is that it has two umbrella shift holes to hold two umbrellas. Why two? Super Soft Light!


In the set-up shown above, I have one strobe on the FourSquare™ pointed into the 43" convertible umbrella that bounces the light back into a 60" shoot through umbrella. This is a very soft and wrapping light that I just love.

Here is a sample image of our model Amira from MM.

Tuesday 12.15.09
Posted by David Tejada
Comments: 7
 

Brando Accessories Kit

For sometime now, I've been using an accessory kit for my speedlights made by Brando.com. This kit comes with a variety of modifiers to help you shape your light. The kit comes with a snoot, grids for snoots, large grid, 360* globe, barndoors, softbox and a reflector.

There are several pieces of this kit I like and other I could do without. I've been using the large grid quite-a-bit as well as the snoot with it's grids. You may remember the photo below from an earlier post, this photo was created using the larger grid from the Brando kit.
In this photo, you can see the flash and grid fastened to the ceiling.


Here is another photo taken last week in San Diego where students used the grid to light their subject.

I've used the 360* globe successfully to light a background that I wanted to knock out pure white.

The system is build around a fitted device which holds all of the modifiers in the kit. This collar fits snugly on the flash head, collars are made for all sorts of flash manufactures and you need to specify which flash you own when ordering.

Here is a photo showing all the modifiers shipped in the kit. I've found the softbox a bit hard to assemble with the small wands provide. The softbox also comes with several color front panels, blue, orange, red, green, and of course white.


The barndoors are a bit small and lame, I just use the one I have listed on my wish list at B&H. As a matter of fact, I have a complete list of items I like using listed HERE.

I haven't worked with the reflector yet, I'll let you know my thoughts about that later. Update: I went to JoAnn's and bought some fabric to put over the reflector and it seems to improve the quality of light. This complete kit costs about $85 bucks. If your looking for some cleaver light modifiers, you just might want to check this out. DT

Friday 12.11.09
Posted by David Tejada
Comments: 5
 

Returning to Indianapolis, IN

Small Strobes, Big Results will be returning to Indianapolis, IN in 2010! Back in November of 2008 we had a fantastic workshop there, hosted by Paulina Osherov at the beautiful Stutz building in downtown Indy. This is a fantastic location, one of my favorites location to shoot at. Endless hallways, antique cars, dining and other unusual areas to photograph throughout the building. Here are a few images from our past workshop in Indy.


We've scheduled the workshop for March 11th & 12th. This will be a special 2 day Small Strobes, Big Results workshop. Besides the usual shooting with small strobes, I'll also be discussing solid business practices marketing and work flow methods that will keep you organized.

The last time we were in Indianapolis we sold out, leaving several people on a waiting list. Please don't let that happen to you, reserve your spot early. This two day workshop is priced at $625, put a 50% deposit down before Dec. 31st and your price will drop to $600. The balance is due by Feb 15th, 2010. If you're interested in attending, please contact me directly.

I am also setting aside up to 5 one-on-one portfolio reviews for an additional cost of $50 each. These will be a assigned on a first come first serve.

tags: Workshops
Friday 12.04.09
Posted by David Tejada
Comments: 7
 

Dubai and Drive By Shooting

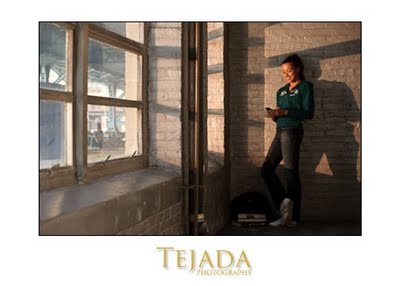
I have just completed my first visit to Dubai. I was teaching lighting and Corporate and Industrial workshops for Gulf Photo Plus, GPP. I want to thank Mohamed and his entire staff at the GPP for making me feel so welcomed. It was an honor and a pleasure to work with 4 other fine instructors I now know as friends. Bobbi Lane, Robin Nichols, Chris Hurtt and David Nightingale. This guy David Nightingale knows what his is doing when it comes to post processing! He has a wonderful blog that I would recommend visiting. I managed to squeeze in a few days of site seeing. One of those days was just driving around town to see the sites.

Dubai is an incredible city to visit, modern in every way. The architecture in this city is remarkable, each building you look at is fancier then previous one. Dubai is also home to the worlds tallest building, The Burj Dubai. Like any big city, traffic is a problem as well as finding parking spaces.

On the day of my departure back to the states, my new friend Esam drove me around town to see some of the sites. While Esam drove, navigating our way through traffic I sat poised in the passenger seat with camera in hand.

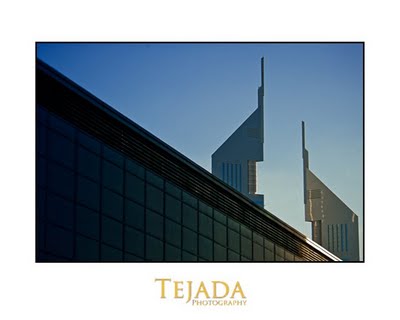
With the congested roads in the city center and convenient round-a-bouts, I was able to crack off a few images I really like. I shoot this photo of the Emirates Towers in downtown Dubia while stopped in traffic. I used the leading edge of the convention center to frame the twin towers. One of the towers is a hotel and the other is an office building.


While driving around the financial center, and circling a round-a-bout I noticed light dancing on the surface or roof of a metro station near by. I had Esam drive around the round-a-bout several times until I was able to get the following shot. I took three revolutions to get something I was happy with. Stopping would have been easier, however, security is tight is this area and photography is generally not permitted without permits.


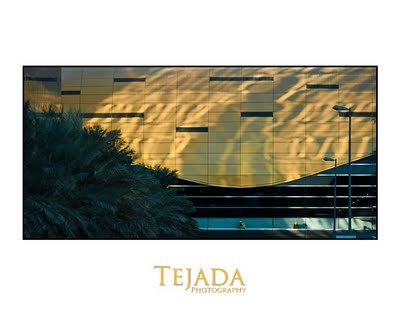
Architectural details are fun to shoot, I look for juxtaposition and strong design elements to frame. I look for reflections in glass and repeating patterns where possible. Of course I would prefer to shoot photos like these using a tripod, however, with a steady hand, fast shutter speeds and a talented driver you can get some pretty nice images.


We did manage to stop the car and shoot around the Burj Dubai at sundown. I'll save those images for a later post. I also had the pleasure to photograph the Shaikh Zayed Bin Sultan Al Nahyan Mosque in Abu Dhabi. This Mosque is the third largest in the world, I'll also save those images for a later post.

tags: Dubai, buildings
Monday 11.30.09
Posted by David Tejada
Comments: 3
 

Work It While You Have Lit!

Several weeks ago I was in Philadelphia teaching a lighting workshop for The Nikonian's Organization. During the course of the workshop, I try my best to demonstrate as many types of lighting that I can squeeze during the time allowed.

For the following photos in this post, I was demonstrating artificial sunlight. I set up two SB-800 outside on tall stands, both fitted with full cuts of CTO's as well as Radio Poppers. The strobes were well outside of line of site and quite far from my camera position.

I think it's very important that you explore as many variation of your shot as possible. Your lights are set, why not try as many different poses and position of your subject as possible. In the short amount of time we had in this one location, I moved Diamandi to various locations within the set. Giving us and her multiple choices at the end of the shoot.

Listen, you've taken the time to set up lights, explore and work your situation too it's fullest.


Tuesday 11.24.09
Posted by David Tejada
Comments: 6
 
Newer / Older

Powered by Squarespace.