
Paying attention to the existing light will give you your first clue. Lets take a look at the following photograph and I'll explain my process and choices for doing what I did. I have photographed in this same location several times, this time I remembered to shoot a set up to share with you.
When I look at the scene before me, I see a long bank of window which I can use as a out of focus as a design element as my backdrop. With the windows on the right side of the frame, it makes sense to me that I should light from the same direction. Doing so allows for a more natural looking light, basically duplicating the lighting pattern that exists.
Lighting choice are many here, I could place my subject in the hard light of an open window if that were the type of light I wanted. I could perhaps place a silk over the window and use the sun as my light source, the silk would act as a large softbox producing a soft quality light.
Space permitting, I could assemble a large softbox or just bounce my light. The day I was photographing, this company was having their board of directors meeting. There was a lot of traffic around the executive floor and the choice of a softbox would just impede movement through this narrow hallway. Bounce was the right choice, and as you can see, look quite natural.
In the photo below you can see the actual setup, I aimed the flash high on the wall about the same height I would have placed another modifier. Special notice should be taken when looking at this photograph. I have a flag or gobo on the far side of the flash, this prevents the light from the flash directly hitting the subject. I want all the light reaching my subject from the bounced subject. I bounced my light on a section of wall between two windows.
On this particular day, I had 3 additional lighting setups on the executive floor. You can see a small card taped to my flash reminding of the setting for this particular shot. I can walk over to the set, look at my note and set my camera to the proper setting.
The card actually serves two purposes, a note to keep me straight and it serves as a small flag preventing flare in my lens.
If you are interested in learning more about the world of corporate and annual report photography I have some great news. This summer, August 5-10th, 2012 I'll be teaching a workshop at the Santa Fe Photographic Workshops titled "Corporate Photography & The Annual Report". If you think you might be interested, contact the workshops at Santa Fe to secure a spot.
Nikon Video Shoot (Part 1)
I've got to be one of the luckiest persons on earth! Way back in June, I received a wonderful email from Nikon asking me if I would be interested in being involved with a project. I had was thrilled to have received that email, the project entailed me being video taped shooting 3 different scenarios for the Learn & Explore online training at Nikon USA website.
My first contact with Nikon came back about 14 years ago. I was in NY visiting clients and decided to make an appointment to show my work to Nikon. From that meeting 14 years ago, I've had minimal contact with Nikon. I was once featured on their website with a article about my work. Two years ago, I took part in a video interview with fellow photographer Steve Vaccariello while visiting Photo Plus in NY.
This project involved 3 separate photographic techniques; bounce, day for night and artificial sunlight.
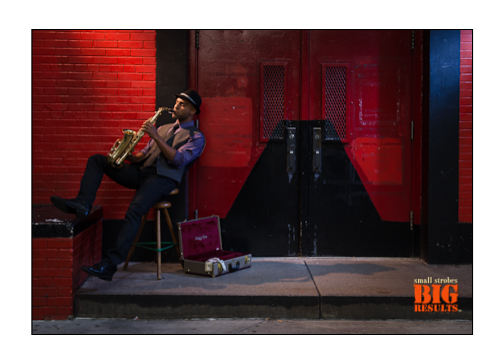
The first photograph I'll discuss here will be the Saxophone player. This photo was taken on a street corner in NY in the middle of the afternoon in open shade. I was given several choices of doorways to select from, the production team of John Sepe was absolutely super. I selected these doors because of the color and the fact that they would be in open shade at 1:30 PM. I knew this because I use a software program (TPE) which tracks the sun movement.

In this first photo you can see the ambient exposure, this was what the camera metering thought was a correct exposure. As I tell my student when I teach, your camera is only a light meter, the exposure meter is between your ears. When I look at the indicated "correct" exposure the camera gives, I think to myself... this doesn't look like night.
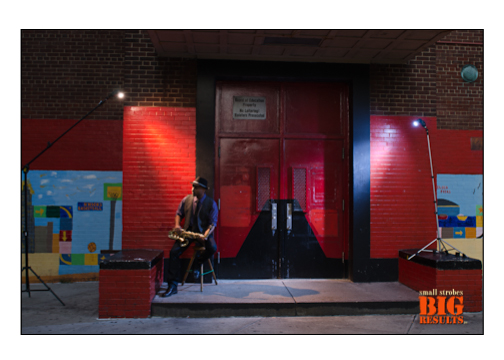
I than drive down the exposure using both shutter speed and aperture to what I would consider an under exposed image looking more like night. I'm not moving my shutter speed above my native sync speed of 1/250 of a second, because I want full efficiency from my speedlights. If I move into high speed sync, I loose a tremendous amount of power from the speedlights.
Needless to say, I'm delighted to appear on Nikon's radar screen once again. This was a substantial project for me, one with high visibility for me and I hope it leads to more projects with them down the road.
It's A Matter of Security

Back in the summer while teaching at the Santa Fe Photographic Workshops, I was contacted by the President of Securitas Energy Service to shoot some new photography for them. After several weeks of moving dates around the calendar we shot the project.
Securitas is a huge security company, one of the largest in the world. I was shooting for only one of several divisions they have, I was shooting for the energy division. Securitas provides security for highly sensitive facilities like Nuclear Power Plants.
My assignment took me to Pittsburgh, PA and Sacramento, CA to photograph to nuclear plants. The Pittsburgh facility was an active plant and the Sacramento facility was a commissioned plant where fuel rods are still stored. It was my first time shooting at such a facility, it was fascinating to see let alone photograph.

The photo at the top of the blog was taken at the Sacramento facility, I noticed the strong graphic shape of the structure suports of the old cooling towers. I placed an employee in the triangle shape and had him walk, stand and various other things that I thought might work.
The photo just above was taken at the Pittsburgh facility. I positioned an employee alone the fence line on patrol. I also made several shots with him looking through a pair of binoculars and talking on the radio.
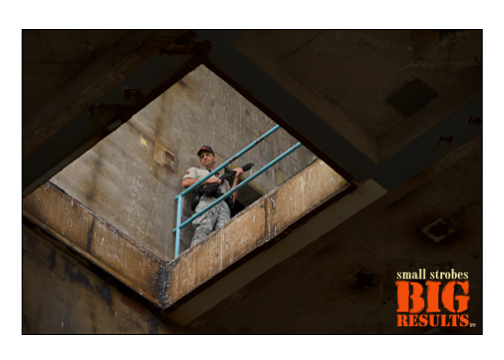
The photo below was taken at the commissioned plant in Sacramento. I liked the diamond shaped opening in the second story floor. I had John, my assistant hold an SB-800 directed at the security guard. You can see a very slight shadow of the employee against the wall from the flash.
I have several other photos from this assignment I'll be sharing in the weeks to come, many of which show some behind the scenes lighting done on location. I hope you'll come back for those. DT
The Executive Portrait

I've been a corporate annual report photographer for a long time now. When you shoot corporate assignments, you need to feel comfortable shooting a variety of subject matter, you need to be versatile.
The photograph above was shot for a new client of mine. They had seen some portraits I did for another client of mine which appeared in an annual report.
When it comes to the executive portrait, I'm looking for a location that denotes a sense of power and confidence. Some of the corporate offices I visit are really nice and finding a location to photograph is not difficult. There are also times where the locations are a bit harder to find, as was the case with the photo above.
The location for this photo was in a realistically small conference room, there was bank of windows on the right side of the room. The conference table was a simple glass table with chrome and leather chairs spaced around the table.
I positioned myself at eye level with the table and arranged the chairs height and position in such a way as to guide the views eye to the subject. The light coming in through the banks of window on the right looked great and I felt that no other lighting would be needed for this portrait.
I've been on the road for about 4 weeks, shooting assignments as well as teaching. Over the next several posts I share some of those assignments with you. I will tell you that on of those assignments was shooting for Nikon. I spent 2 days shooting in NY for Nikon's Learn & Explore web site. I was video taped shooting 3 different photos, I'm looking forward to showing those to you soon.
I leave for Hawaii next Thursday for Popular Photography's Mentor Series. With the recent snow here in Denver, I can tell you that I'm looking forward to some nice warm weather.
LED Lights
 For the past several years, I've been carrying around an LED light in my photo bag. I actually own several, the lest expensive I've found has come from Gadget Brando. These are wonderful little lights that have a good amount of power to them. One nice feature is that these lights have an adjustable knob on them which allows you to dim light without shifting the White Balance.
I used one of these lights in the photo above. My assistant John was in the back seat in this mining tug next to my subject. John simply held the light as we were driving through the dark mine. I thought it to be a very useful light source as it provide a means for me to focus as well as enough power to shoot with. DT
Looking Into The Sun

Shooting into the sun can produce some very dramatic effects and present some difficult exposures for you. I use the sun as a design element, which plays an important part in the overall composition of the image.
An exposure from an image like the one shown above would most likely be something like, 1/250th @ f/22.0 at ISO 100. I really like getting that star effect off the sun, the only way to get this effect is to use a steep or deep aperture like f/22.0, f/16.0, or f/11.0. The steep or deeper the f-stop, the more the star effect.
The EXIF data on this image says that I shot this photo at 1/160th @ f/22.0. I used an SB-800 to lite my subject, and the flash way just outside of the frame of the image. If I am not mistaken, I think the flash was set to about 1/2 or 1/4 + 2/3. The flash had no modifier on it so it was a direct flash.
In the image above, my assistant John was on an adjacent tank on top with an SB-800. I used a Radio Popper to trigger the flash as I was not in line of sight of the flash. Often when shooting is strong sunlight, the CLS system falls short and a third party system is called for.
In the above photo, I had John stand next to me with a monopod extended in the air above the bent pipe with an SB-800 on it. From this position, I was able to use the Nikon CLS system to trigger my strobes.
I'm leaving for Europe today, I'll be giving 4 workshops in Austria and I also have a speaking engagement in Vienna for Nikon. I'm looking forward to this trip and I will try to post while on the road. Good shooting. DT