• Portfolio
  • Blog
  • Travel
    • Russia/Estonia
    • Istanbul
    • Hong Kong
    • India
    • Morocco
    • Thailand
    • Italy
    • Vietnam
    • Spain/Portugal
    • Egypt
    • United Arab Emirates
    • Ireland
    • Myanmar
    • Croatia
    • Mauthausen Concentration Camp
  • Headshots
  • Fine Art Prints
  • New Work
  • About
  • Instagram
  • Contact
Assignment Photography for Corporate America
  • Portfolio
  • Blog
  • Travel
    • Russia/Estonia
    • Istanbul
    • Hong Kong
    • India
    • Morocco
    • Thailand
    • Italy
    • Vietnam
    • Spain/Portugal
    • Egypt
    • United Arab Emirates
    • Ireland
    • Myanmar
    • Croatia
    • Mauthausen Concentration Camp
  • Headshots
  • Fine Art Prints
  • New Work
  • About
  • Instagram
  • Contact

Lightroom Pick

I've been using Adobe's Lightroom program since their bata first came out. Just love this program! I've been going through my library of images and ran across this older image and I thought I'd post it.

I was traveling through the Orlando airport years ago and grabbed this shot. It was the light that caught my attention, warm and directional. I had made mention to my wife the quality of the light earlier in the concourse. As we turned a corner, I spotted this older man sitting and reading his morning paper.

When you think about it, it truly is all about the light. Doesn't matter what the subject matter is when you have light like that. More of my work can be seen at my home website.

Tuesday 09.18.07
Posted by David Tejada
 

Using Foreground Elements

Placing foreground elements within you shot not only create depth in a photograph, it is an excellent way to frame your subject.

This shot here was done for a hospital client in their lab. By placing beakers and other glassware on a cart in front of the lens, allowed me to frame my subject easily by moving the glassware for a pleasant composition. I lit the lab technition using a softbox from the left, I used a grid with a full CTB gel, this is where the blue cast is coming from on her left side of her head.

Using the backs and shoulders of other in a photo is another good way to frame you intended subject. I was shooting for a Real Estate developer who operates hundreds of apartment complexes around the country. I took one of their sales persons outside on an overcast day and put together this composition using an on sight maintenance person and another sales person as perspective renters.

I used a Nikon SB-800 on a stand pumped through a small octobox to the subjects right (camera left) a fill card was used to bounce fill into the shadow side of the face.

Here are a few more examples applying the same techniques as above. Using foreground elements really help to draw the viewers eye where you want them to go. The only lighting added to the UPS photo below was a fill card held by my assistant to the left of the frame just out of sight. The fill card bounces sunlight back into the subjects opening the shadow side of the face.

The last photo was shot for an oil & gas client in their drafting department. Once again by use of a foreground element depth and framing directs the viewers eye to what is important...Your subject.

I've been shooting for Fortune 500 companies for over 24 years specializing in annual report work. I love this type of work, I never know whats going to handed to me in the way of subjects or weather. Be sure to visit my website to view additional work.

Monday 09.17.07
Posted by David Tejada
Comments: 2
 

A Sense of Scale

Having a sense of scale in a photograph is critically important. I try when ever possible, to include a person (more than likely my assistant) within the photo. This not only provides a sense of scale to the photo but it also allows you the opportunity to interject some human interest.

It's my opinion that the photo here at the left would be less interesting without the 2 worker wearing yellow slickers below at the bottom of the frame.

I this situation, I had the use of walkie talkie's to communicate with the worker below. I was able to position them wherever I wanted and direct them to pose and gesture as needed. Basically I'm recreating an activity that you might see just waking through the facility.

I was shooting an annual report for a chemical company some years back on the gulf coast of Mississippi.

During the summer months you have these wonder sunsets on the gulf coast. I had a wonderful leading line of the pipe straight out to the ship being filled with product. Bay placing a worker in the photo, you see what I mean. Just put your finger over the worker, still a strong graphic shot but more interesting with someone in the shot.

This photo was taken for one of the many oil & gas clients I have. I shot this photo just east of Denver and because it was so close to my home, I was able to scout the location ahead of time. While scouting, I saw this composition and knew I just had to shoot it.

This pipe runs east and west and I wanted to take advantage of a sunrise for this shot. I had a compass with me and I took note of the excite compass heading the pipe was running. When I got back to my office, I went to the web for information relating to sunrise time and compass heading where the sun would rise. For that information, I head to USNO which stands for U.S. Naval Observatory. This online resource is wonderful, you simply plug in your location or the locations your traveling to and the information comes up instantly.

As it turned out, this pipe was running straight inline with the sunrise. Just got lucky! Before I leave on assignment, I check out USNO and print out the sunrise and sunset information for each of the locations I'm traveling to on assignment & vacation.

tags: Muse
Sunday 09.16.07
Posted by David Tejada
Comments: 3
 

Road Rags for light control

I recently purchased a set of Matthews Road Rags Light Control Kit. I think these control devices will come in handy. The kit comes in two sizes 18"X24" and 24"X36". My kit is the smaller of the two.

Road Rags are extremely portable light modifiers, the kit comes with a couple of scrims, a flag, one silk and 2 frames to hold them. This kit is very portable and lite weight. The complete kit measures 20"x5"x8" inches (LxWxH). The frames are made of aluminum and are joined with elastic shock cords, very similar to collapsible tent poles.

Here is a look at the kit folded into it's travel size.


You can see from the photo at the left that the frames fold up quite small. The photo below shows the frame opened.

It appears that the frame is larger that 18"x24" however, when the modifiers are placed over the frame it pull in to the 24" width.

I ran a test to see how the artificial silk would work as a diffusion for my small strobes. I used a flexarm to position the frame and a Matthews Miningrip Head to hold the frames.

I used an SB-800 mounted behind the silk just to the left out of frame. I also place a reflector to bounce some light back in on the shadow side of my face. You can see the set up in the next two photos.

As I continue to try to lighten my load, I find tools like Road Rags that add to the stuff I carry. Time will tell if I get the use out of these as I thought I would when I purchased them.

tags: Equipment
Friday 09.14.07
Posted by David Tejada
Comments: 3
 

High Tech Lab Shot

I recently posted a video showing some of the flash equipment I take on certain assignments. The video showing some of the additional items such as Morris Mini's were used here.

First I will tell you that I used a total of 4 lights in this very small location at a lab in Ohio.

Let's first look at the reflection in the glassware at the left of the frame. I used a Vivitar 283 with a blue gel over the flash head with a small softbox attached to the head of the strobe. This strobe was held in place with a Bogen type (Avenger) clamp & flexarm. I had a slave plugged into the strobe which allowed it to fire when another flash in the room went off.

For the main subject, the technician was lit with a single dyna-lite head with a grid on it to contain the light from spilling all over place. The orange light behind the glassware just to the right of the technician was created using a morris mini with an orange gel. I simply taped the strobe to the wall in the corner of the venting hood. The mini fires with the use of a built in slave on the flash. One 4th light gelled with blue, was bounced into the ceiling to the right of the technician to fill the upper right corner of the image with color.

tags: Equipment, Lighting
Friday 09.14.07
Posted by David Tejada
 

A day without the assistant

I had an assignment the other day where my assistant was unavailable to "assist me" so I headed out on my own. I'd rather shoot with an assistant any day, doing this stuff on your own is difficult. Having an assistant allows me to fully concentrate on the photos and the lights and gear thing can be handled by the assistant.

Anyway, I had to shoot executives in an office environment. I have shot in these office several times before and I am now suggesting to my client that they move. We have shot this place out!

Because I was without an assistant, I chose to go lite with the lighting gear. I've been doing that a lot lately. I find it very challenging to head out with just the small strobes. The gear on this shoot consisted of my Nikon SB-800 set and a few reflectors.

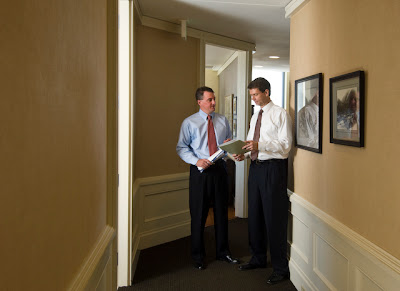
This shot here to the left was shot using 2 SB-800 strobes. I had one in the door opening to the left of the subjects standing in the hallway. I used a folding Westcott umbrella to pump the strobe through to soften the light. The other strobe was placed on a stand just below my lens and bounced into the wall just to the left of the camera for fill. The shutter was dragged in order to capture the ambient light in the background. Down the hall in one of the offices, I set up another shot with 3 executives taking at the doorway.

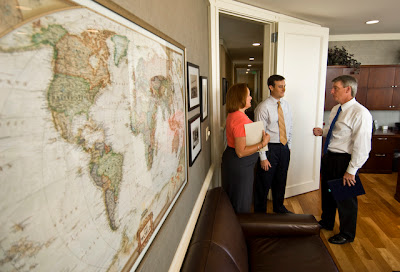
Here I used just one SB-800 on a stand, camera right and bounced off the ceiling. I was using my Nikon 12-24 mm lens for this shot. By placing myself close to the wall and map, I was able to use the distortion to my benefit. The strong lines of the map draw your eyes to the subjects at the doorway. Another shot I had to do was with 2 other executives talking.

Actually, I knew I had to shoot 4 shots that morning. 3 of those where of executive taking (visiting) with each other and the 4th one in the conference room. I didn't know where I was going to shoot the executives, just find an interesting place somewhere. The 3rd shot here is one of those interesting places, the break room.

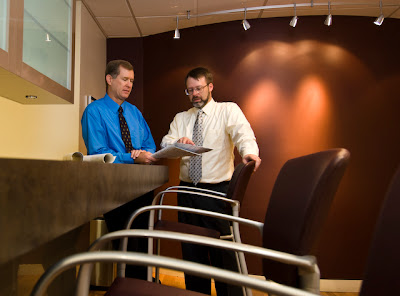
This shot was lit with one SB-800 pumped through an umbrella. The shutter was dragged in order to capture the lights on the back wall. I used the bar stools in the foreground to lead you eyes into the shot to where these stiff executives are standing. They really did not want to be there, we go through this every year. Even though they complain every year, they love the photos when the annual report comes out.

The final shot was the most difficult to obtain. First, I working with a bunch of regular people that are not use to being in front of the camera. Well, at least once a year. Anyway, the designer wanted a shiluette of executives in the boardroom which he was going to screen back on the cover of the annual report along with 2 other stock photos.


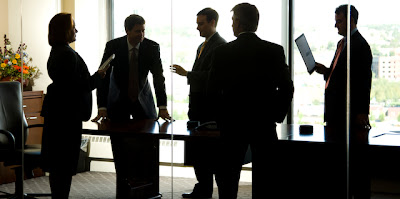
The problem I had here is that this boardroom did not have a full bank of window behind the subjects. Just behind the the two men in the center of the shot, there is a solid wall. I needed to blow out the wall with light to equal the two other windows on the left and right. I placed a SB-800 strobe on a stand to the left of the frame in the conference room. I pointed it at the wall in the center of the shot and blasted the hell out of it. I used cinefoil to flag off the light from hitting the subject in the center closest to the wall. I been using PocketWizards to fire all the strobes on this assignment.

I've been shooting corporate annual reports for 24 years and absolutely love doing so. It can be very challenging at times which I enjoy, and I also like the travel which comes with the territory. Additional work can be seen at my web site.

Friday 09.14.07
Posted by David Tejada
Comments: 2
 
Newer / Older

Powered by Squarespace.