• Portfolio
  • Blog
  • Travel
    • Russia/Estonia
    • Istanbul
    • Hong Kong
    • India
    • Morocco
    • Thailand
    • Italy
    • Vietnam
    • Spain/Portugal
    • Egypt
    • United Arab Emirates
    • Ireland
    • Myanmar
    • Croatia
    • Mauthausen Concentration Camp
  • Headshots
  • Fine Art Prints
  • New Work
  • About
  • Instagram
  • Contact
Assignment Photography for Corporate America
  • Portfolio
  • Blog
  • Travel
    • Russia/Estonia
    • Istanbul
    • Hong Kong
    • India
    • Morocco
    • Thailand
    • Italy
    • Vietnam
    • Spain/Portugal
    • Egypt
    • United Arab Emirates
    • Ireland
    • Myanmar
    • Croatia
    • Mauthausen Concentration Camp
  • Headshots
  • Fine Art Prints
  • New Work
  • About
  • Instagram
  • Contact

Hackintosh.... I did it!


I am always looking to reduce the amount of stuff I have to carry on assignment and personal trips. I recently bought a Dell Inspiron mini 10V netbook, in order to reduce the size of my travel computer. I'm a MAC guy and it hurt me to buy a Dell for sure, however, my Dell is now a MAC!

All I really need from my travel computer is the ability to check email, surf the web, store images, and video conference with my wife and son via Skype. I typically don't process my images on the road, I really just need a way to view them and store them until I get home.

I ran across a wonderful web site that showed in detail, how to convert a Dell 10V into a MAC. The web site is called Gizmodo.com and the actual post which gives you the details to do this is here. I am so excited to have done this, I've been a MAC guy forever and just did not understand how the Windows system worked. I guess you just get use to what your use to? Anyway, I now have a min netbook MAC with OSX Snow Leopard running and I couldn't be happier.

tags: Equipment, Laptop, travel
Monday 02.01.10
Posted by David Tejada
Comments: 10
 

Costa Rica - How I'm Packing My Gear

At the end of this month, I head to Costa Rica on my 4th Mentor Series Trek. I'm really looking forward to visiting Costa Rica, this will be my first time there. I thought I'd give you an idea how I'm packing for this trip.

Like a lot of you, I've owned a lot of different camera bags over the years. I own rollers, backpacks and belt systems to carry my gear. I choose the carrying method based upon the assignment at hand. On this particular trip, I'll be taking my new Lowepro Vertex 200 AW. I'd have to say it is one of the finest constructed backpack style camera bags I've had the pleasure of using.

As usual I'll be taking two camera bodies, my primary, a Nikon D700 and my Nikon D300 as backup. I'll also be taking along a new snap and shoot from Nikon, the CoolPix P90. I'm looking forward to play with that.

The lenses I'll be taking with me will include the following: My Nikon 14-24 f/2.8, Nikon 24-70 f/2.8, Nikon 80-400 f/4.5/5.6, Just to keep the weight down, I've opted for the 80-400 instead of the 80-200 f/2.8. I'll be also bring a cleaning kit, loupe, neutral density filters and a polarizer filter and my tripod. I'll be taking plenty of CF cards, a laptop to download images to as well as an external HD for backup.

Here is what the inside of the Vertex 200 AW looks like packed.


What I like in particular are these clever outside zipper pockets that allow me to arrange my various filters and CF cards. You'll also notice a nice tripod holder on in the center of the pack. I might also add that the pack is very comfortable to wear, it's harness system allows for a variety of adjustment to fit your particular body type.


I'm just amazed how much camera stuff we take as photographers when we travel and how important it is to protect it. Not only the protection offered by well made camera bags but also when your gear is in your hotel room. I've used a clever device called PacSafe for years. My PacSafe 85 is large enough to secure my Lowepro backpack safely in my hotel room. Basically, it is a high-tensile stainless steel locking mesh device that allows me to lock my bags to a secure fixture in the room ie. toilet.

During the Mentor Series Treks I'll be giving lighting demonstrations using speedlights. With that in mind, I'll be bring 2 SB-800's, a small Bogen light stand and Justin clamp. The modifiers I'll take with me will be the double folding 43" inch Wescott umbrella as well as my 33" folding Lastolite Tri-Grip.

tags: Equipment, Mentor Series
Monday 01.25.10
Posted by David Tejada
Comments: 10
 

Fencing Part 2

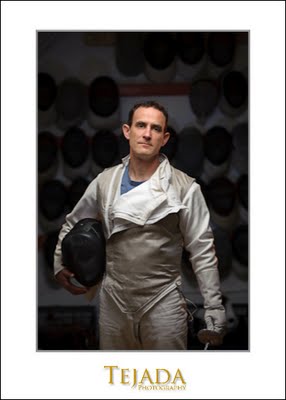
In part 1 of my fencing shoot, we combines a small amount of ambient light with a single flash with a grid. With this photo, I killed the ambient light choosing instead to light the entire scene with strobes. I used a much softer quality light on my subject, opting for a overhead softbox. I positioned my subject in front of a wall rack full of fencing masks, the repetitive pattern of the masks made for a nice background.

For this series of photos I untimely ended up using 4 Nikon SB-800 strobes. The strobes all fired using the Nikon CLS system. My key light is a single SB inside a FourSquare™ the strobe was set to group A and boomed overhead. A used a Quantum Turbo SC battery to power the strobe.

For the rim or kicker lights, I had two SB-800's, each with a full cut CTO (color temperature orange) gel on the flash head. I used a set of barndoors on each strobe to control the spread of light and help prevent flare in my lens. I assigned both strobes to group B as they had the same distance to travel and both strobes received the same amount of power. Just as a side note: All strobes assigned to a particular group in this case group B, will all fire at the same power level. You can not adjust each strobe independently if they are assigned to the same group.

The background flash was an SB-800 with a full cut CTB (color temperature blue) gel on it. A CTB gel converts a tungsten light source to daylight. Since the strobe is already a "daylight" balanced light source, the gel raises the kelvin temperature which has a cooling affect on the light. The flash head was zoomed to 50mm and place into group C.


From my camera position and using the SU-800 commander, I was able to shut off the various groups to show the build of lights. In the following series of photos you can see the progression of adding lights on the subject. The first with just the key light, the second with the addition of kickers, and the third with all strobes firing including the background.

Here I'm fitting one of the rear kicker strobes with a barndoor. These are really inexpensive modifiers and I use them a lot. They cost about $10.00 each.

You may have notice that I make no mention about what power settings I'm using. Personally I don't care, I make a creative choice to shoot at certain aperture and than adjust the power on the strobes to fit that. I wanted a shallow DOF to soften the background, that happened to be f/2.8.My son Chris shot some video during the shoot, it shows the photographing of both part 1 and part 2 of these posts.

tags: Assignment Work, Equipment, SB-800
Friday 09.11.09
Posted by David Tejada
Comments: 6
 

Radio Poppers Are The Ultimate!

What more can I say other than AWESOME. I've had a few weeks to play with the new Radio Poppers PX system and I just love them. The PX system allow me the ability to use my Nikon CLS system at distances previously unheard of. I'm able to control my strobes remotely in both iTTL, manual, and high speed sync.

I took a walk with my hand held GPS across the field behind my house to a distance of 750 feet to the end of the field. You can see a flash at the bottom center of the image, I had complete control over all the functions of my strobe at this distance. At the Radio Poppers website they state that Radio Poppers are the most advanced wireless control system in the world, I'd have to agree.

I use a SU-800 command unit to fire my strobes, the PX Transmitter fits on the face of the SU-800 command unit, it relays the signal from the command unit to a PX receiver mounted to my SB-800 strobe. The Radio Popper took only a few moments to set up and it is absolutely seamless to use.

You don't need to use an SU-800 command unit, you can use another SB-800 as a master unit if you wish. You simply use all the menu commands on your master strobe or SU-800 command unit as you normally do. The PX system simply relays those signal, and your good to go.

Before using this system, I had an invisible leash of about 35 or 40 feet using Nikon's CLS system, even less on bright out door settings or when your strobes are place in such a position that your strobes do not see the pre monitor flash from your master.

I had an opportunity to use my Radio Poppers while giving a lighting demo at Slickrock, near Moab during my recent "Mentor Series Trek" for Popular Photography Magazine. I used a FourSquare™ to light the biker in the above photo. During the workshop, I passed around the SU-800 with the PX Transmitter attached to it and I simply hand held the strobes for the students. Everyone was just blown away by the size of the Radio Poppers and the simplicity of the system.

If you are looking for a wireless system to extend your range from the normal distance that your flash manufacturer allows, I'd say go Radio Popper. The PX system works with all sorts of other flash systems as well, just check out their website you'll be just as blown away as I am.

tags: Equipment
Friday 07.10.09
Posted by David Tejada
Comments: 10
 

One Really Fine Lens

Not long ago, I bought a very inexpensive lens for my camera kit.  As you know, I shoot Nikon equipment and have done so since 1973.  I bought the 50 mm f/1.8 lens for only $109.00, what a steal for such a fine lens.


I just love the shallow DOF this lens provides when shot wide open.  These two shot where shot for the annual report referenced on an earlier post. 

I might as well add an additional shot using this lens.  Just look at the bokeh that this lens produces.  Bokeh is the term referring to the appearance to out-of-focus (ness,ness) of the areas in an image produced by a camera lens using a shallow depth of field (DOF).

The lighting on the above photo was direct sunlight passing through a 42 inch diffusion 5 in 1 flexfil collapsible reflector.  If your looking for a very nice inexpensive lens to add to your arsenal, look at the 50 mm f/1.8 Nikon lens.  B&H has this lens at a very reasonable price.  DT

tags: Equipment
Thursday 10.23.08
Posted by David Tejada
Comments: 12
 

Proofing with portable DVD

This was the last assignment for 2007. I was asked to photograph 9 executive head shots as well as environment portraits. This short video shows the set-up of the head shots as well as one of the environment portraits we had to do.

I've been using a portable DVD player on location in order to see a larger image than what is provided on the back of the camera. I find it a lot easier for my clients and subjects to review the images than crowding around the back of the camera. Have a look here. DT

tags: Equipment, Videos
Wednesday 12.26.07
Posted by David Tejada
Comments: 28
 
Newer / Older

Powered by Squarespace.