• Portfolio
  • Blog
  • Travel
    • Russia/Estonia
    • Istanbul
    • Hong Kong
    • India
    • Morocco
    • Thailand
    • Italy
    • Vietnam
    • Spain/Portugal
    • Egypt
    • United Arab Emirates
    • Ireland
    • Myanmar
    • Croatia
    • Mauthausen Concentration Camp
  • Headshots
  • Fine Art Prints
  • New Work
  • About
  • Instagram
  • Contact
Assignment Photography for Corporate America
  • Portfolio
  • Blog
  • Travel
    • Russia/Estonia
    • Istanbul
    • Hong Kong
    • India
    • Morocco
    • Thailand
    • Italy
    • Vietnam
    • Spain/Portugal
    • Egypt
    • United Arab Emirates
    • Ireland
    • Myanmar
    • Croatia
    • Mauthausen Concentration Camp
  • Headshots
  • Fine Art Prints
  • New Work
  • About
  • Instagram
  • Contact

Snoot that strobe

Here is a classic sample of the use of a snooted strobe.

I wrapped my Nikon SB-800 strobe head with Cinefoil creating a snoot on my flash. By containing the spread of light, I was able to light just the subject "Mitch" without contaminating the rest of the wall.

I used an additional Nikon SB-800 with a CTB gel (cooling gel) aimed down the row of meters.

Here is a sample of the type of snoot fashioned on location. I keep several pieces of Cinefoil with me for this very purposes. Cinefoil cam also be used to flag off light, by placing a piece of foil on the side of the strobe.

I made a post some time ago before I spoke at Brooks Institute of Photography in Santa Barbara, Calif. In this post I show my small lighting kit, you might find it interesting. Hope you enjoyed the post. DT

tags: Equipment
Wednesday 09.19.07
Posted by David Tejada
Comments: 1
 

Lightroom Pick

I've been using Adobe's Lightroom program since their bata first came out. Just love this program! I've been going through my library of images and ran across this older image and I thought I'd post it.

I was traveling through the Orlando airport years ago and grabbed this shot. It was the light that caught my attention, warm and directional. I had made mention to my wife the quality of the light earlier in the concourse. As we turned a corner, I spotted this older man sitting and reading his morning paper.

When you think about it, it truly is all about the light. Doesn't matter what the subject matter is when you have light like that. More of my work can be seen at my home website.

Tuesday 09.18.07
Posted by David Tejada
 

Using Foreground Elements

Placing foreground elements within you shot not only create depth in a photograph, it is an excellent way to frame your subject.

This shot here was done for a hospital client in their lab. By placing beakers and other glassware on a cart in front of the lens, allowed me to frame my subject easily by moving the glassware for a pleasant composition. I lit the lab technition using a softbox from the left, I used a grid with a full CTB gel, this is where the blue cast is coming from on her left side of her head.

Using the backs and shoulders of other in a photo is another good way to frame you intended subject. I was shooting for a Real Estate developer who operates hundreds of apartment complexes around the country. I took one of their sales persons outside on an overcast day and put together this composition using an on sight maintenance person and another sales person as perspective renters.

I used a Nikon SB-800 on a stand pumped through a small octobox to the subjects right (camera left) a fill card was used to bounce fill into the shadow side of the face.

Here are a few more examples applying the same techniques as above. Using foreground elements really help to draw the viewers eye where you want them to go. The only lighting added to the UPS photo below was a fill card held by my assistant to the left of the frame just out of sight. The fill card bounces sunlight back into the subjects opening the shadow side of the face.

The last photo was shot for an oil & gas client in their drafting department. Once again by use of a foreground element depth and framing directs the viewers eye to what is important...Your subject.

I've been shooting for Fortune 500 companies for over 24 years specializing in annual report work. I love this type of work, I never know whats going to handed to me in the way of subjects or weather. Be sure to visit my website to view additional work.

Monday 09.17.07
Posted by David Tejada
Comments: 2
 

A Sense of Scale

Having a sense of scale in a photograph is critically important. I try when ever possible, to include a person (more than likely my assistant) within the photo. This not only provides a sense of scale to the photo but it also allows you the opportunity to interject some human interest.

It's my opinion that the photo here at the left would be less interesting without the 2 worker wearing yellow slickers below at the bottom of the frame.

I this situation, I had the use of walkie talkie's to communicate with the worker below. I was able to position them wherever I wanted and direct them to pose and gesture as needed. Basically I'm recreating an activity that you might see just waking through the facility.

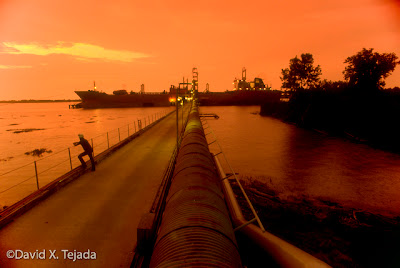
I was shooting an annual report for a chemical company some years back on the gulf coast of Mississippi.

During the summer months you have these wonder sunsets on the gulf coast. I had a wonderful leading line of the pipe straight out to the ship being filled with product. Bay placing a worker in the photo, you see what I mean. Just put your finger over the worker, still a strong graphic shot but more interesting with someone in the shot.

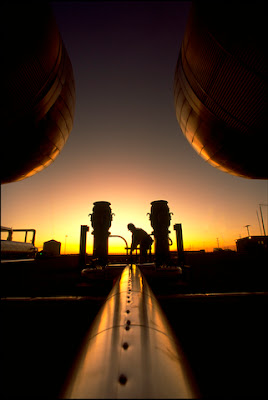
This photo was taken for one of the many oil & gas clients I have. I shot this photo just east of Denver and because it was so close to my home, I was able to scout the location ahead of time. While scouting, I saw this composition and knew I just had to shoot it.

This pipe runs east and west and I wanted to take advantage of a sunrise for this shot. I had a compass with me and I took note of the excite compass heading the pipe was running. When I got back to my office, I went to the web for information relating to sunrise time and compass heading where the sun would rise. For that information, I head to USNO which stands for U.S. Naval Observatory. This online resource is wonderful, you simply plug in your location or the locations your traveling to and the information comes up instantly.

As it turned out, this pipe was running straight inline with the sunrise. Just got lucky! Before I leave on assignment, I check out USNO and print out the sunrise and sunset information for each of the locations I'm traveling to on assignment & vacation.

tags: Muse
Sunday 09.16.07
Posted by David Tejada
Comments: 3
 

Road Rags for light control

I recently purchased a set of Matthews Road Rags Light Control Kit. I think these control devices will come in handy. The kit comes in two sizes 18"X24" and 24"X36". My kit is the smaller of the two.

Road Rags are extremely portable light modifiers, the kit comes with a couple of scrims, a flag, one silk and 2 frames to hold them. This kit is very portable and lite weight. The complete kit measures 20"x5"x8" inches (LxWxH). The frames are made of aluminum and are joined with elastic shock cords, very similar to collapsible tent poles.

Here is a look at the kit folded into it's travel size.


You can see from the photo at the left that the frames fold up quite small. The photo below shows the frame opened.

It appears that the frame is larger that 18"x24" however, when the modifiers are placed over the frame it pull in to the 24" width.

I ran a test to see how the artificial silk would work as a diffusion for my small strobes. I used a flexarm to position the frame and a Matthews Miningrip Head to hold the frames.

I used an SB-800 mounted behind the silk just to the left out of frame. I also place a reflector to bounce some light back in on the shadow side of my face. You can see the set up in the next two photos.

As I continue to try to lighten my load, I find tools like Road Rags that add to the stuff I carry. Time will tell if I get the use out of these as I thought I would when I purchased them.

tags: Equipment
Friday 09.14.07
Posted by David Tejada
Comments: 3
 

High Tech Lab Shot

I recently posted a video showing some of the flash equipment I take on certain assignments. The video showing some of the additional items such as Morris Mini's were used here.

First I will tell you that I used a total of 4 lights in this very small location at a lab in Ohio.

Let's first look at the reflection in the glassware at the left of the frame. I used a Vivitar 283 with a blue gel over the flash head with a small softbox attached to the head of the strobe. This strobe was held in place with a Bogen type (Avenger) clamp & flexarm. I had a slave plugged into the strobe which allowed it to fire when another flash in the room went off.

For the main subject, the technician was lit with a single dyna-lite head with a grid on it to contain the light from spilling all over place. The orange light behind the glassware just to the right of the technician was created using a morris mini with an orange gel. I simply taped the strobe to the wall in the corner of the venting hood. The mini fires with the use of a built in slave on the flash. One 4th light gelled with blue, was bounced into the ceiling to the right of the technician to fill the upper right corner of the image with color.

tags: Equipment, Lighting
Friday 09.14.07
Posted by David Tejada
 
Newer / Older

Powered by Squarespace.