
I finally found the time to put this latest video together. Been running crazy for the past several days. As I had mentioned on a previous post, I only have video for the second day of our shoot at the quarry. The first day, the G9 (which we use to film) was left in another car and we were to busy to retrieve it. This video is showing the sunrise photography only, I'll try to remember to keep the camera closer. I hope you enjoy it. DT
thatsmymonkey.com Spotlight
This morning, "thatsmymonkey.com" has posted a featured article about me in there Spotlight section. I'm honored to be featured and I hope you take the time to read the article.
I want to thank both Michael and Bruce Snell for the post. They have a wonderful site and I hope you take the time to look it over. DT
Building a Ring Flash
I've had a lot of comments regarding my earlier post about the ring flash I built. A lot of you wanted a step by step tutorial on how I made mine. That being said, here we go.
My first step was a visit to my local Home Depot store, straight to the electrical department. Here you will find a standard 10.5 inch utility light.


The next stop was the heating department, ventilation stuff. I found a 4" X 5" coupler for what I believe is for a furnace vent of sorts. This item is shown below.
 This heating coupler is the part your camera lens will be shooting through. The smaller end of this coupler will end up coming through the top of the light dome. This photo below should give you the idea how things will be fitting together.
 The next step is to mark on the top of the light dome where you will be making the opening to fit the two pieces together. In this photo you can see this step. You will also notice that I have put my first coat of paint on it as well. Remember, it is the small end of the coupler I'm sizing as it is this side which will be coming through.

 As you can see from the photo above, I'm marking the inside diameter of the coupler. I would rather enlarge the hole later than try to make it smaller, you get the point. After marking the top of the dome, I now have a visual on where to make my cut. Before doing so, I drilled small holes around the future opening. This made it easier when I started using the tin snips to cut the opening. Here are a few more photo to show the process.


 The next step is to cut out the top part of the light dome. I use a pair of tin snips I had in my work shed. Here you can see the process.


 Now that I have the top off, I can fit the heating coupler through the opening. You may as I had to, cut additional portions in order to fit the coupler through. Warning. don't make this hole to large, make it just fit. Have a look here.


 In order to secure these two parts together, I used JB Wield. I'm sure some other epoxy would work fine. Before using JB Wield, I used a small hammer to try to close any excess metal around the coupler for a more snug fit.
 After the epoxy has dried, your ring flash will start to resemble the final product. This is getting exciting isn't it!
 One very nice thing about using this utility lamp is that the inside is already shinny, no tin foil or other reflective material to fashion together. Now you need to make a place for your flash to enter the ring. I've made two of these, one for a Nikon SB-800 and the other for a Nikon SB-28. The photo below is showing me making a template for my strobe.

 Cut out the template and place it near the forward edge of the lamp. Tape the template to the dome and began drilling hole like before. Use your tin snips to cut away the opening. After opening this hole, I hammered the rough edge and than taped it with gaffers tape.

 Now we need the diffusion material for the front of the ring. I just so happened to have this material available in my studio. I used a material called, Trans-Lum from Calumet. I have visited there web site looking for this material and I can't find it. Anyway, the material you need is something thin, strong and something that will not hold back a ton of light. Here are a few photos showing this material and the fitting of it.


 On the second ring flash I made, I tried to glue the diffusion material to the front of the lamp with Gorilla Glue. This did work some what, it has a cleaner look than using the black gaffers tape on the first ring flash, your choice.
The next step is to find a way to mount the strobe and ring flash together. Here again, I had odds and ends around to fashion this rig together. I used a camera mounting plate which came with a bogen flexarm for the bottom of the camera. Shown here.
 On to this I attached a mounting stud, shown here as well.
 On to this, I attached a small ball head. On to this, I attached a flash shoe mount to hold the actual strobe. I used two fashioned together to give me additional length to reach the hole for the front of the strobe. I understand that most of you will not have these items laying around for your use. I would recommend using a series of L brackets to accomplish this part of the project. I have seen other mounting systems that you might be able to employ. Try looking here and come up with a solution that works for your particular flash and camera combo. I actually starting building Richard Melanson ring flash before I came up with this design.


 When my flash is pushed up into the bottom opening, the back of the ring flash is tucked up under the prism housing on the camera. This system seems to work well.
I do want to point out the following points. When I hold my camera, my left hand is under the strobe and my right is not only holding the camera I am resting my index finger against the back ring. This feels very natural to me and the camera and flash ring works as a unit.
Please take a look at my other post on this ring flash, it will show you more photos and samples of the photo results. I hope this post was helpful and you have fun building your own ring flash. DT
Monterey & San Francisco Photos
I was recently asked by a reader of my blog, if I could post some of my personal shots from my recent assignment. After shooting the Quarry in the Salines Valley, Erik and I headed to Monterey and San Francisco for some personal shooting. So here are a few of them. This photo was shot in a cemetery Pacific Grove. I shot this with my Canon G9 which I just love.
 This next photo of a lighthouse was taken just across the street from the cemetery. The gate to the pathway to the lighthouse was locked, so I had to stand on a trash can to get this shot. This photo was also taken with the Canon G9.
 What a beautiful pant this is, I don't know the name but I just love it! I was driving by some very expensive homes along the shore just south of point Lobos. I was checking out all the beautiful homes and my eyes saw this plant. I used the G9 on macro, hand held. WOW.
 These next few where shot in San Francisco, I was shooting with my Nikon D2X. I had driven
 up to the Coit Tower, on Telegraph Hill in downtown S.F. I was shooting south to this building and happened to catch 2 birds flying between the two up rights and a person in mid stride on one of the floors. I shot this using a 80-200mm f/2.8 lens.
From here, Erik and I drove across the Golden Gate Bridge to photograph the city from the other side of the bay. I had never taken any photos from this area before, but have seen countless numbers of them over the years.
The weather was just perfect, clear with lots of ships passing under the bridge. I used all types of lens here, 12mm - 300mm f/2.8 San Francisco is such a special place, I love visiting and photographing this city.
Here are the images shot from across the bay, all where shot with the Nikon D2x except for the last image of the sunset. That photo was taken with the G9.
I sure do appreciate hearing from all of those who post comments on my blog. I just don't know who's reading and how many. Or if anyone is really interested in it at all. I started this blog as a dairy for myself, I never really keep a journal of all my travels and assignments earlier in my career. But now with the internet, I can not only write about my photography but I can also share my photos. The internet wonderful, I just love it.
Also, look for a profile write up about me on That's My Monkey:Digital Photography Tips & Tools in the next few days. I've been told that it should be up tomorrow or the next day.
Anyway, here are the last of the personal photos taken on this last assignment, enjoy. DT


 Additional work can be seen at my website TEJADAPHOTO.COM
I've specialized in annual report photography for Fortune 500 companies for 24 years.
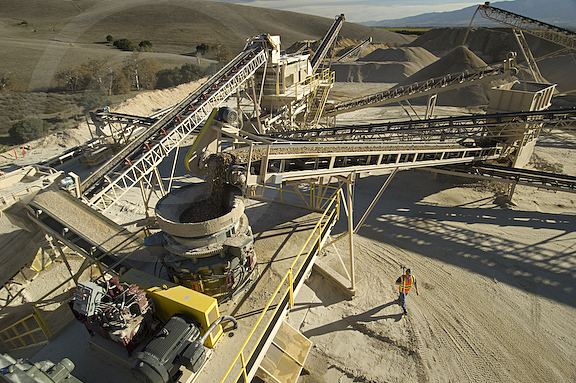
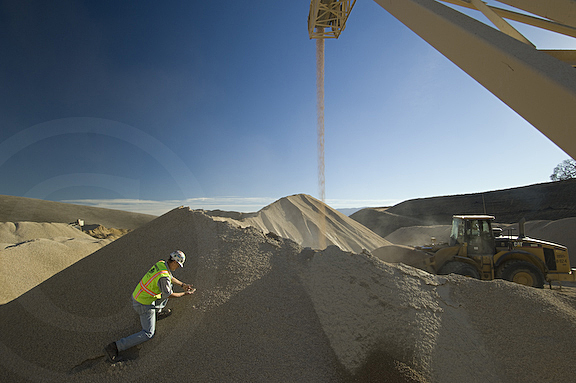
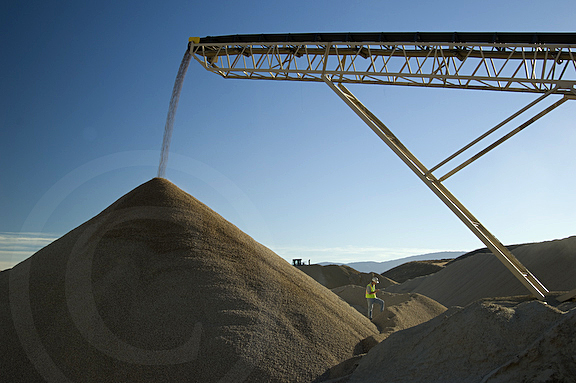
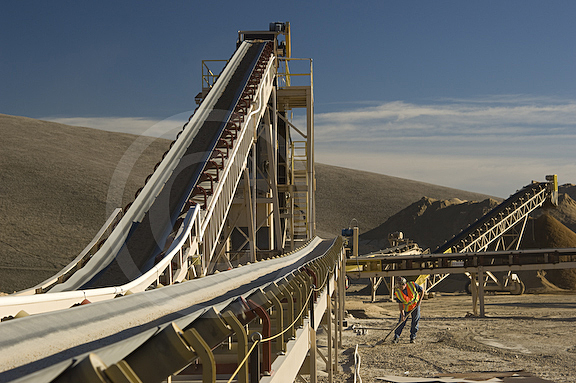
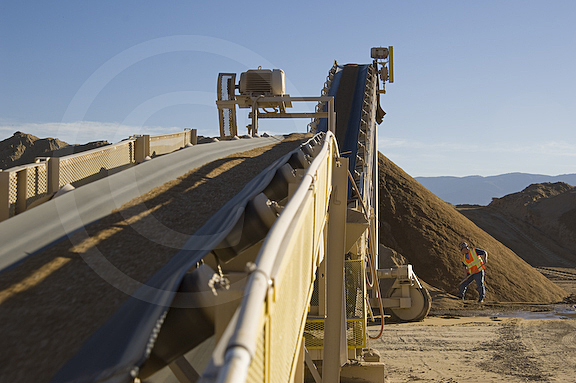
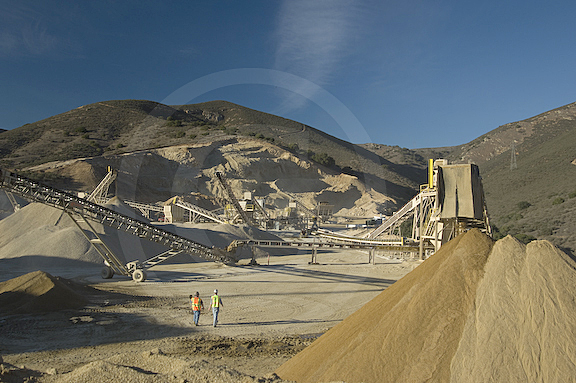
Quarry Results
I got back from our quarry shoot mid day on Saturday. At first glance I'd say that I am pleased with the results. We had nice weather to shoot in, and the Salinas valley is beautiful. We also managed to squeeze in some personal shooting in Monterey and San Francisco.
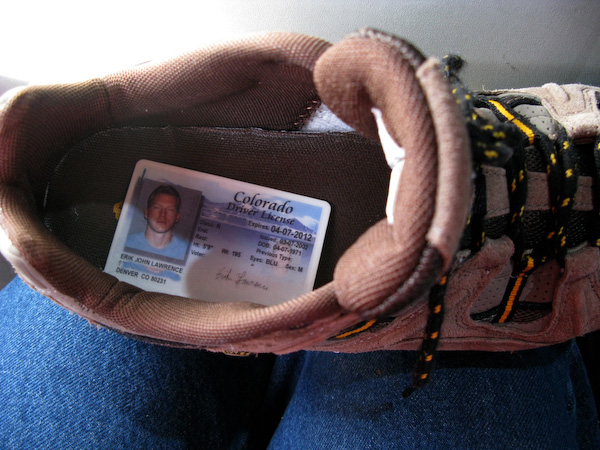
Erik and I arrived in SFO at 11:00 am on Wednesday, we had a short 2 1/2 hour drive south to the Salinas valley where the quarry was located. We had a bit of a scare regarding Erik's ID (Drivers License), during the flight he was unable to locate where he put it. He didn't remember putting it back into his wallet and he searched and searched for it, checking each pocket several times. At some point, I suggested looking in his shoes. Now a days, we all have to remove our shoes and perhaps his ID ended up there? Sure enough, there it was in the right shoe!
I was warned before leaving on this job that the quarry was small and not all that interesting. I actually found the quarry nice, small, clean and compact.
We arrived at around 2 pm, put our steel toed boots and other safety gear before driving into the quarry. One thing which we forgot to take with us into the quarry was the Canon G9, which we use to film our videos. Needless to say, we have no video from our first day shooting. We made sure to have it available the following morning for sunrise though.
Here are some of the images shot the first day, The video of the following mornings photography will be posted very soon. DT

Quarry Grip & Such
OK. Here is the last of the equipment that will be going with us on assignment. Should be self explanatory and again, if you have questions feel free to comment.
Just heard from my contact at the Quarry, (writing this the day before leaving) that the quarry is not that large and impressive as I might think. My contact said that he has seen my work and knows that his location will be a challenge. "Not nearly as impressive as the locations I've seen on your web site". Apparently, this quarry was only started a year ago. Well see. Here's the last video of gear. DT