• Portfolio
  • Blog
  • Travel
    • Russia/Estonia
    • Istanbul
    • Hong Kong
    • India
    • Morocco
    • Thailand
    • Italy
    • Vietnam
    • Spain/Portugal
    • Egypt
    • United Arab Emirates
    • Ireland
    • Myanmar
    • Croatia
    • Mauthausen Concentration Camp
  • Headshots
  • Fine Art Prints
  • New Work
  • About
  • Instagram
  • Contact
Assignment Photography for Corporate America
  • Portfolio
  • Blog
  • Travel
    • Russia/Estonia
    • Istanbul
    • Hong Kong
    • India
    • Morocco
    • Thailand
    • Italy
    • Vietnam
    • Spain/Portugal
    • Egypt
    • United Arab Emirates
    • Ireland
    • Myanmar
    • Croatia
    • Mauthausen Concentration Camp
  • Headshots
  • Fine Art Prints
  • New Work
  • About
  • Instagram
  • Contact

Fencing Part 2

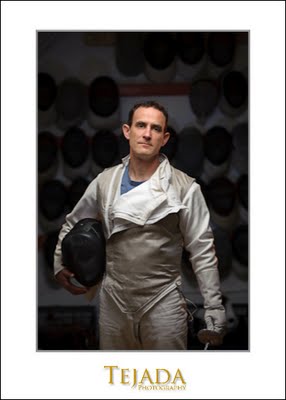
In part 1 of my fencing shoot, we combines a small amount of ambient light with a single flash with a grid. With this photo, I killed the ambient light choosing instead to light the entire scene with strobes. I used a much softer quality light on my subject, opting for a overhead softbox. I positioned my subject in front of a wall rack full of fencing masks, the repetitive pattern of the masks made for a nice background.

For this series of photos I untimely ended up using 4 Nikon SB-800 strobes. The strobes all fired using the Nikon CLS system. My key light is a single SB inside a FourSquare™ the strobe was set to group A and boomed overhead. A used a Quantum Turbo SC battery to power the strobe.

For the rim or kicker lights, I had two SB-800's, each with a full cut CTO (color temperature orange) gel on the flash head. I used a set of barndoors on each strobe to control the spread of light and help prevent flare in my lens. I assigned both strobes to group B as they had the same distance to travel and both strobes received the same amount of power. Just as a side note: All strobes assigned to a particular group in this case group B, will all fire at the same power level. You can not adjust each strobe independently if they are assigned to the same group.

The background flash was an SB-800 with a full cut CTB (color temperature blue) gel on it. A CTB gel converts a tungsten light source to daylight. Since the strobe is already a "daylight" balanced light source, the gel raises the kelvin temperature which has a cooling affect on the light. The flash head was zoomed to 50mm and place into group C.


From my camera position and using the SU-800 commander, I was able to shut off the various groups to show the build of lights. In the following series of photos you can see the progression of adding lights on the subject. The first with just the key light, the second with the addition of kickers, and the third with all strobes firing including the background.

Here I'm fitting one of the rear kicker strobes with a barndoor. These are really inexpensive modifiers and I use them a lot. They cost about $10.00 each.

You may have notice that I make no mention about what power settings I'm using. Personally I don't care, I make a creative choice to shoot at certain aperture and than adjust the power on the strobes to fit that. I wanted a shallow DOF to soften the background, that happened to be f/2.8.My son Chris shot some video during the shoot, it shows the photographing of both part 1 and part 2 of these posts.

tags: Assignment Work, Equipment, SB-800
Friday 09.11.09
Posted by David Tejada
Comments: 6
 

Corporate Portrait

Being an annual report photographer in Denver and having shot for more than 25 years of corporate assignments, I have built strong working relationships with graphic designers and various other creative people in the industry. For this assignment, I was contracted to photograph "Tensie" for an Ethics & Compliance Report by my New York agent.


My client wanted both head shots and 3/4 length shots of Tensie in an environmental setting. Erik & I arrived about 45 minute prior to the scheduled shoot time in order to scout and set up lights in the location the client had set aside for us.

The client had set aside a very small conference room to photograph Tensie in. Upon arriving at our location the first thing I do is to conduct a location assessment. This assessment consists of the following considerations. Space size, existing lighting (if any/ambient), furnishings and available props.

This particular location worked well, we had contemporary furnishings, daylight windows to camera left and diffusion glass panels of the conference room camera right. The attached video will show the entire set up of the room and lights.

I used some of the daylight coming through the window as a fill light in the room. Sunlight was striking the back wall camera left, I was able to control the amount of fill using the blinds over the windows. We placed a single SB-800 strobe outside of the conference room and directed through the frosted glass panel. The glass panel was not really frosted, instead it had small holes in the frosted material. We did a test shot of Erik to see the quality of light the glass produced. The results of the light passing through the glass panel can be seen below.

I've attached a diagram to illustrate the setting we had to deal with in terms of setting.

After looking at our first test shot, I felt the light needed to be soften a bit more. I ended up putting a diffusion panel up against the glass to further diffuse the light before it struck the subject. The results of that additional panel can be seen here in the second photo of Erik.

If you look closely at the top of the frame of the above photo, you will notice some spill of raw "flash" light striking the back wall and ceiling. By adding additional gobo's to the flash, I was able to contain or prevent the spill of that raw light in the final images. Tensie arrived with several change of clothing for the shoot, we did 3 outfit changes in order to give the client plenty of choices. Here are a few more photos from the shoot as well as the accompanying video.  I have an earlier post showing similar lighting tools using a single panel and one strobe here.


If your interested in learning more about location lighting using small strobes, please visit Small Strobes, Big Results.  You can see results from our August 2nd workshop here.

tags: Assignment Work, Big Results, SB-800, Small Strobes
Monday 08.18.08
Posted by David Tejada
Comments: 7
 

Seeing the Possibilities


One of the hardest thing for me when I was new to lighting, was seeing the possibilities in a location.  When I first started in photography, I was lucky to have worked with a very talented photographer in Houston, TX.  Those who followed this blog my remember me mentioning his name in the past, Joe Baraban.


When I went to work for Joe, I had never been in a studio before, seen or used strobes let alone realize that you could actually make a living taking pictures.  It would just blow my mind to watch Joe walk into a drab location and absolutely transform it using light. Joe could see the possibilities in his minds eye and creating a dramatic scene which was not immediately visible me.  Developing this kind of skill takes time, practice and hard work.   

When I arrive on location, go through a process of location assessment.  What type of lighting is existing, tungsten/daylight/other.  Do I have control over those light sources, can I use any one of those or all of those lights to my advantage?  I mentally close my eyes to the existing light and imagine the scene lit differently using my light (the one's I have with me at the time) and what other light that may exist.  The amount of equipment you have on hand surly determines how far you can transform a location with light.

When I arrive in a location or space that is larger than I can possibly light with the gear on hand,  I still think BIG however I might light SMALL.  I'm going to let the existing ambient light do the heavy lifting for me, I'm going to use what ever ambient light that available as my fill.  I can than use my lights to accent the details.

I shot the above photo this morning.  I was walking through our master bedroom and thought this would be a good exercise in lighting. I'll show you the process of building this shot with the series of photos below.

Here is how the original scene looked before starting. Bedroom entrance is to the left of the frame. We have three windows pouring in light to the room. Two of those are at camera right on either side of the bed and the other directly behind me and to my right. In this shot the camera WB was set to daylight

In the photo below, I've added one SB-800 strobe on a boom zoomed to the 105 setting on the head in order to light the painting on the right.  I have also fitted the head with a foam flag to prevent the light from falling forward toward the floor and lens of the camera.
 

In this next photo, you can see that I have added another SB-800 on a boom to light the painting on the left side of the frame.  This was my first exposure with this added light and I realized that I did not put a full CTO (Color Temperature Orange) filter on the strobe. Remember that the WB on the camera is set to tungsten and any daylight (strobes) will have a cooler color temp. in the photo. 

I corrected the color of the strobe by adding a full CTO to it and repositioned it to a more pleasant position on painting on the left.  The results of those changes are shown below.

I than asked my son who was busy downstairs fighting an intense battle of Halo to sit in for a test shot.  I wanted to see what the scale of the shot would look like and how I might light a person seated in the chair.

I than grab another SB-800, put a grid on it and feathered the light just past and in front of his face.  The grid I use is one which was designed for a Novatron Snoot.  With a little gaffers tape and velco, the grid works well.  I might also add that I put a full CTO filter on this strobe as well.  The results of adding this 3rd light is shown here.

You throw a few Sterno cans in the fake fireplace and you have a real cozy environment. In short order, Chris was bored and and quickly fell asleep.  I wonder if it had anything to do to the fact that I gave him the Wall Street Journal to read?

The rest of the photos show the complete set up of lights and one showing a panel at the window at the far right.  I did so because this was a new window and we have not put blinds up yet, that's on my "honey do" list.

I hope you have enjoyed this post, look around your own home and pick a spot and practice with your lights!


tags: Lighting, SB-800
Thursday 07.03.08
Posted by David Tejada
Comments: 14
 

Powered by Squarespace.