One of the hardest thing for me when I was new to lighting, was seeing the possibilities in a location. When I first started in photography, I was lucky to have worked with a very talented photographer in Houston, TX. Those who followed this blog my remember me mentioning his name in the past, Joe Baraban.
When I went to work for Joe, I had never been in a studio before, seen or used strobes let alone realize that you could actually make a living taking pictures. It would just blow my mind to watch Joe walk into a drab location and absolutely transform it using light. Joe could see the possibilities in his minds eye and creating a dramatic scene which was not immediately visible me. Developing this kind of skill takes time, practice and hard work.
When I arrive on location, go through a process of location assessment. What type of lighting is existing, tungsten/daylight/other. Do I have control over those light sources, can I use any one of those or all of those lights to my advantage? I mentally close my eyes to the existing light and imagine the scene lit differently using my light (the one's I have with me at the time) and what other light that may exist. The amount of equipment you have on hand surly determines how far you can transform a location with light.
When I arrive in a location or space that is larger than I can possibly light with the gear on hand, I still think BIG however I might light SMALL. I'm going to let the existing ambient light do the heavy lifting for me, I'm going to use what ever ambient light that available as my fill. I can than use my lights to accent the details.
I shot the above photo this morning. I was walking through our master bedroom and thought this would be a good exercise in lighting. I'll show you the process of building this shot with the series of photos below.
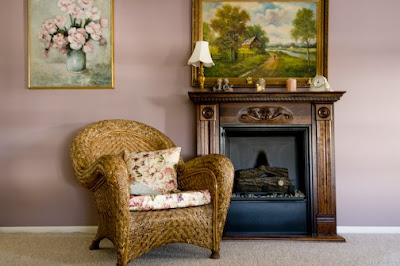
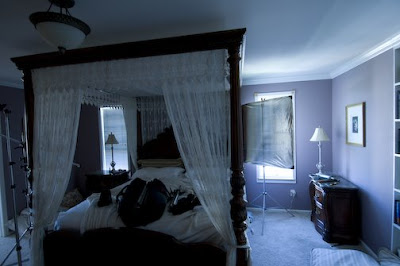
Here is how the original scene looked before starting. Bedroom entrance is to the left of the frame. We have three windows pouring in light to the room. Two of those are at camera right on either side of the bed and the other directly behind me and to my right. In this shot the camera WB was set to daylight
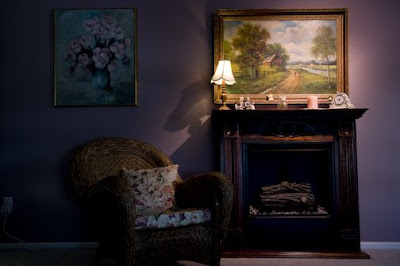
 In the photo below, I've added one SB-800 strobe on a boom zoomed to the 105 setting on the head in order to light the painting on the right. I have also fitted the head with a foam flag to prevent the light from falling forward toward the floor and lens of the camera.
In this next photo, you can see that I have added another SB-800 on a boom to light the painting on the left side of the frame. This was my first exposure with this added light and I realized that I did not put a full CTO (Color Temperature Orange) filter on the strobe. Remember that the WB on the camera is set to tungsten and any daylight (strobes) will have a cooler color temp. in the photo.
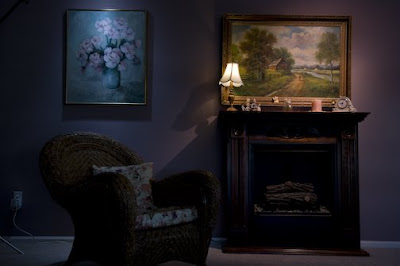
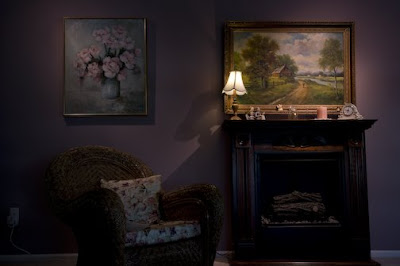
I corrected the color of the strobe by adding a full CTO to it and repositioned it to a more pleasant position on painting on the left. The results of those changes are shown below.
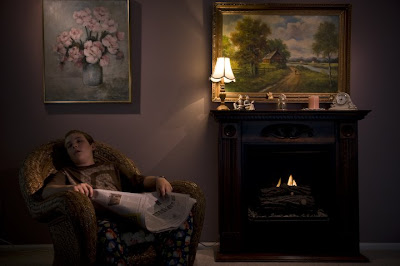
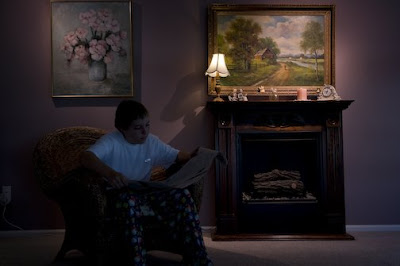
I than asked my son who was busy downstairs fighting an intense battle of Halo to sit in for a test shot. I wanted to see what the scale of the shot would look like and how I might light a person seated in the chair.
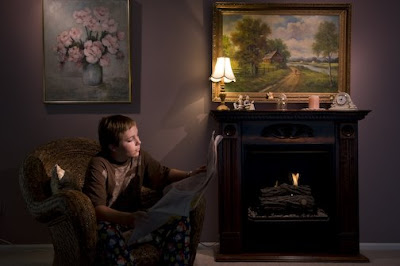
I than grab another SB-800, put a grid on it and feathered the light just past and in front of his face. The grid I use is one which was designed for a Novatron Snoot. With a little gaffers tape and velco, the grid works well. I might also add that I put a full CTO filter on this strobe as well. The results of adding this 3rd light is shown here.
You throw a few Sterno cans in the fake fireplace and you have a real cozy environment. In short order, Chris was bored and and quickly fell asleep. I wonder if it had anything to do to the fact that I gave him the Wall Street Journal to read?
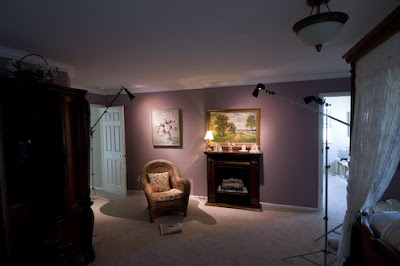
The rest of the photos show the complete set up of lights and one showing a panel at the window at the far right. I did so because this was a new window and we have not put blinds up yet, that's on my "honey do" list.
I hope you have enjoyed this post, look around your own home and pick a spot and practice with your lights!


 In the photo below, I've added one SB-800 strobe on a boom zoomed to the 105 setting on the head in order to light the painting on the right. I have also fitted the head with a foam flag to prevent the light from falling forward toward the floor and lens of the camera.
 I corrected the color of the strobe by adding a full CTO to it and repositioned it to a more pleasant position on painting on the left. The results of those changes are shown below.
 I than asked my son who was busy downstairs fighting an intense battle of Halo to sit in for a test shot. I wanted to see what the scale of the shot would look like and how I might light a person seated in the chair.
 I than grab another SB-800, put a grid on it and feathered the light just past and in front of his face. The grid I use is one which was designed for a Novatron Snoot. With a little gaffers tape and velco, the grid works well. I might also add that I put a full CTO filter on this strobe as well. The results of adding this 3rd light is shown here.
 You throw a few Sterno cans in the fake fireplace and you have a real cozy environment. In short order, Chris was bored and and quickly fell asleep. I wonder if it had anything to do to the fact that I gave him the Wall Street Journal to read?


